Every type of foot needs special treatment in terms of running shoes and lacing technique. I have spent ample hours to bring out the best and most practical guide on how to lace running shoes. All the below-mentioned techniques and patterns are gathered after deep research and self-testing.
For a runner, there are critical factors such as the comfort of the feet, fitting of the shoe, and so on. Each pair of feet is different in its own way, by following the proper technique you can dodge the fatigue and pressure from your feet. I have also covered the scientific data related to each technique which will help in relating.
Therefore, to give you clarity about how to lace your running shoes, I have listed the lacing technique for each type of foot. You may go through them one by one and make a final choice as per requirement. I hope all the 15 mentioned techniques will definitely help you to achieve what you always dreamt of.
How To Lace Running Shoes to Get the Ultimate Comfort
1. For Wide Feet
If you have wide feet, you can conveniently tie your laces by following the image shown.
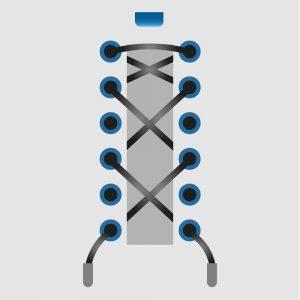
The wide forefoot is quite a common type of feet and some brands manufacture exclusive collections for such feet. If the above type of lacing doesn’t suit you, try the following steps of lacing. This procedure keeps your feet loose and maintains the comfort and spaciousness in your running shoes.
- Lace your shoes in a criss-cross style.
- The laces should pass through each eyelet.
- Rest fasten the laces as you normally do.
The impressive thing about this lacing technique for wide feet, in general, is that it loosens the entire shoe and gives your feet enough room to breathe and move.
Check our Article Best Running Shoes for Wide Feet
2. For Narrow Feet
The basic requirement for even a narrow foot is more room while you run. Though owning a shoe with a snug fit is always preferable but too much compact fitting may not allow you to flex.
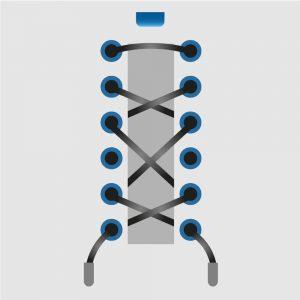
Also, ill-fitted shoes may hinder your toes from spreading comfortably and may extensively affect your performance as well. Further, while lacing your running shoes ease the pressure while tieing so that you maintain normal blood flow.
Therefore, for your ease, skip an eyelet and lace-up in a criss-cross manner as we learned for wide feet issues. This technique will keep your shoes a little tighter. You can follow the steps mentioned below:
- To start with, lace your shoes in a criss-cross style
- Skip an eyelet and continue to follow the criss-cross pattern
- Once you are done with all the eyelets, tie up your laces
To conclude this style of lacing for narrow lacing is that it keeps the shoe tight more than the other techniques.
Check our Article Best Running Shoes for Narrow Feet
3. For Arch Support
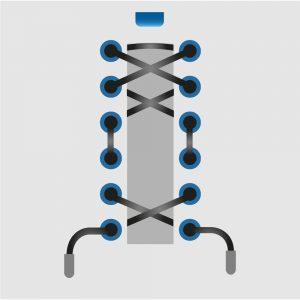
Runners have different arch types which are generally high to low. So, if you implement the right shoe lacing technique, you will save yourself from foot fatigue.
For instance, with a high midfoot lacing technique, you will experience improved stability of the running track. All you have to do is tie your shoes by skipping one or two laces which will give room to your midfoot space.
Once you strictly follow the above steps, tie up your laces by leaving the top holes so that your mid-foot area stabilizes on the midsole. Besides, runners with flat feet need special lacing techniques and shoes with orthopedic soles. We will discuss this in the upcoming section.
4. For Plantar Fasciitis
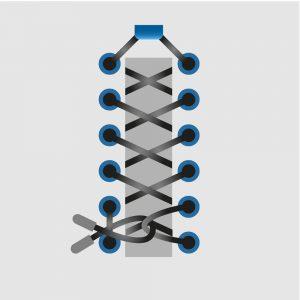
There is hardly any particular lacing technique for the runner suffering from plantar fasciitis. However, the lacing technique used for runners with flat feet can be used in the case of Plantar Fasciitis.
In order to avoid overstretching of the plantar fascia and the medial tendon traumas, you should also choose shoes that are specially designed for flat feet.
In this technique, follow the normal lacing procedure but in the end, make a pulled up loop as shown. This will give extensive support for flat feet.
5. For High Arches
As discussed above, there are specific lacing styles that work well for particular arch types. Most pronators have high arches which makes them vulnerable to the outer foot roll motion when they run.
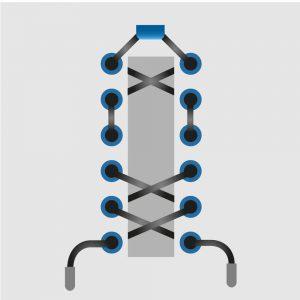
The shown lacing pattern will give needed support to avoid supination. Also, high arch lacing style benefits in alleviating the tightness as well as enhances the comfort level to the shoe fitting by simply opening up the middle zone of the lacing style.
- To start with, follow the criss-cross pattern through the first pair of eyelets.
- Now, ensure that you thread the shoe laces only through the sides.
- Finally, lace up your shoes through the coming two eyelets or more as usual.
To conclude, the merit of this lacing technique alleviates the tightness and gives you the utmost comfort.
6. For Toe Pain
Other problems that are quite common in runners are toe pains and black toenails. The toe pain lacing technique cuts off the chances of any fatigue and you don’t have to deal with any numbness as well.
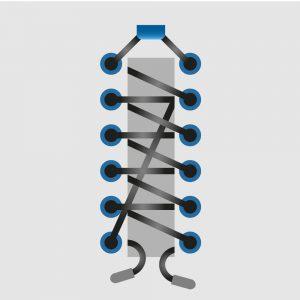
The below-mentioned lacing technique benefits your feet by lifting the toe cap area of your running shoes. Also, it increases the space around your toes.
- Thread your shoelaces from the big toe to the top eyelet in the opposite direction
- Similarly, lace the other side of the shoelace at each bottom eyelet diagonally and then at the top parallel to every hole
- Finally, tie up your laces as you usually do.
In short, the lifted toe cap implies more room for your shoes which will save your toe from hurting time and again.
7. For Foot Pain
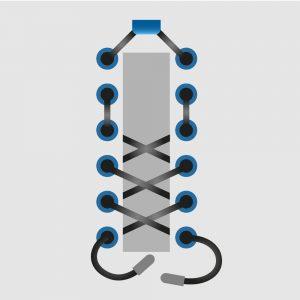
Foot pain issues are often found in runners with a wide forefoot. The lacing technique used for wide forefoot gives more room to the forefoot region as well as makes the toe box spacious enough in your running shoes.
- First, start tying your shoelaces only through the sides.
- After completing the sides, start from mid-foot upwards and thread in a criss-cross style.
- Lastly, tie up your laces in the usual manner only.
It is one of the most suitable ways to get rid of foot pain. It helps that by creating more space in your toe box area.
8. For Walking
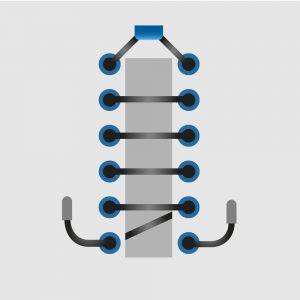
If you have high arches, most shoes might rub the upper area of your feet that interrupts walking. This continuous walking results in itching and irritation. To get rid of that you should start implementing a lacing technique known as Lydiard lacing or parallel lacing as shown in the image.
This parallel lacing technique will greatly reduce the pressure at the top region of your shoes and let you go for a perfect run.
9. For Flat Feet
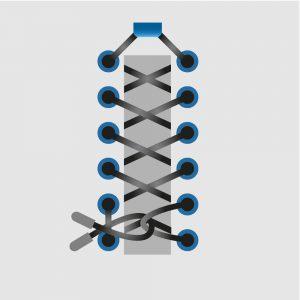
As discussed in the plantar fascia which is quite common in runners with flat feet, the lacing technique is almost the same in this method. To deal with the flat feet problem, runners prefer either barefoot shoes or think that neutral shoes are a better choice to make.
In the lacing pattern for the flat feet, opt for a pulled-up loop. This pulled-up loop gives humongous support for the flat arches.
10. For Heel Slipping
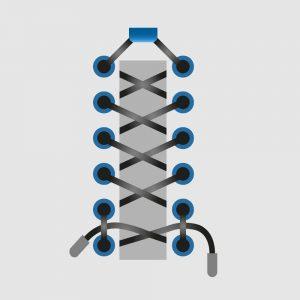
The crucial thing to keep in mind while you are running is to keep your foot right in place when you are in motion. Heel stability happens when there is any distraction and instability. This instability may cause accidents as well. To save yourself from any mishap, refer to the image shown and follow the procedure mentioned below.
The pattern suggested in the image keeps your feet compact and right in place. Also, to enhance your performance, use the seventh lace hole and make a loop lace lock.
In addition to this, if you lace your shoes using a 7-eyed lacing style with a sturdy grip, it gives much better results than the usual 6-eyed technique. It also helps in the minimization of dorsal pressure and plantar fascia.
11. For Ankle Support
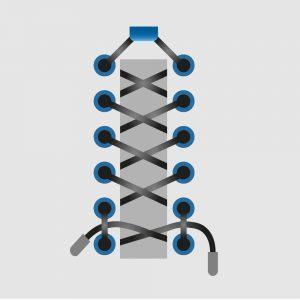
The lacing technique preferable for ankle support is quite similar as we discussed for heel slipping. The technique mentioned below is beneficial to impart extensive ankle support as well as it doesn’t make your shoe too tight to wear.
- Follow the usual lacing pattern until you reach the second to last eyelet.
- Thread directly into the final eyelet without following the crisscross pattern.
- Lace your shoes through the loop on the other side.
- Finally, tie up your laces in the usual manner only.
In this technique, your ankle will get better support and the complete fitting will not be too tight to make you uncomfortable.
12. For High Midfoot
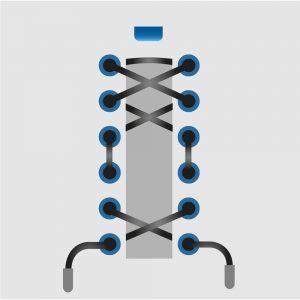
If you are suffering from high midfoot issues, you can simply solve them by skipping one or two criss-cross patterns. This practice will create comparatively more space for your midfoot. For more clarity, you may refer to the image shown and also follow the below-discussed steps carefully.
- Start threading your running shoes in a criss-cross style.
- Lace your shoes just through the sides of your midfoot.
- Once you cross the point of discomfort, again follow the crisscross pattern
- Lastly, tie the laces as you usually do.
13. For Wide Forefoot
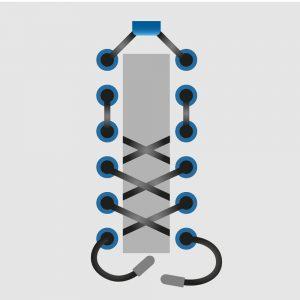
The wide forefoot lacing up technique will give more space around your forefoot area. Not only this, it will make more room in your toe box by simply following the steps below.
- Start lacing up through the sides of your shoes.
- Right from the midfoot upwards then follow the criss-cross style
- In the end, tie up in the youtube manner.
14. For Narrow Heel + Wide Forefoot
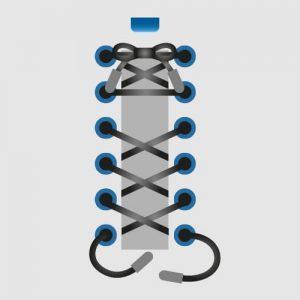
Some runners prefer breathability and spaciousness inside their running shoes. The narrow heel and wide forefoot lacing technique are used to manage the grip or snug fit during running to fulfill this need.
In this pattern, either tighten or loosen your laces wherever you feel like. Also, for this, you need two separate laces. The benefit is that this gives you control to tighten up or loosen up your laces.
Additionally, there are shoes that feature lace pockets to keep the threads out of your way. It reduces the chances of stepping on them and also minimizes the distraction.
Also check our Article Best Running Shoes with Wide Toe Box and Narrow Heel
15. For Numb Feet
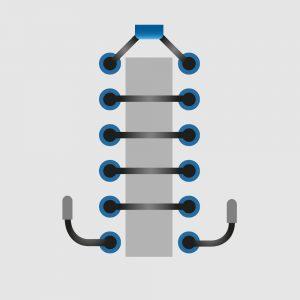
This lacing technique uniformly distributes the laces for added comfort and to avoid numb feet. Act in accordance with the mentioned steps and there you go.
- Without using the usual crisscross pattern, lace the shoes in a parallel pattern.
- Lace by keeping the laces below every other hole.
- Finally, use the traditional pattern to tie up your laces.
Common Lacing Techniques
After discussing the most common yet unique lacing techniques as per your feet type, I feel these lacing techniques should be known to every runner reading this write-up. Let’s explore.
1. Window Lacing Technique
This lacing technique is also known as box lacing. It largely reduces the pressure points on the top region of your foot.
2. Runner’s Loop
This lacing pattern is beneficial to protect your heel area. Also, it avoids your toes from sliding or slipping in the forward region of your shoe.
3. Secure Knot
In this lacing technique, then tweak keeps the laces safer.
Conclusion
Especially if you are a runner, you should try to gather as much information related to various shoes and the tying techniques.
Even after owning the correct pair of shoes for yourself, if you are still facing discomfort or fatigue, you need to look into your lacing technique. Once you go through how to lace running shoe techniques, you will get a lot of ideas which eventually you can apply as per your daily requirements.
All you need to do is to master the basics of lacing techniques, make sure to check the quality of your laces, the number of shoes in your shoes, and the type of knot you are opting to secure the laces. Have a successful run.
Please include attribution to theglorun.com with this graphic.

Share this Image On Your Site
<p><strong>Please include attribution to theglorun.com with this graphic.</strong><br><br><!--kg-card-begin: html--><a href="https://www.theglorun.com/how-to-lace-running-shoes/" class="kg-card kg-image-card" style="display: block;"><img src="https://www.theglorun.com/wp-content/uploads/2021/08/Lacing-Running-Shoes-Inforgraphic-scaled.jpg" alt="How to Lace Running Shoes" border="0" class="lazyload kg-image" data-src="https://www.theglorun.com/wp-content/uploads/2021/08/Lacing-Running-Shoes-Inforgraphic-scaled.jpg"></a><!--kg-card-end: html--></p>


Join the conversation